Friday 26 February 2010

Normal... Moping (I am literally (not literally)) on fire with the puns today.

Alright. Quite an eventful, if not very interestingly so, week this week. I always forget exactly how it's gone but it's safe to assume that i've worked on both mine and andy's projects. Both are still running side-by-side meaning we've not cleared up the rigs on andy's project yet, but it's just how it goes. It never was going to be as easy as we though eh. I won't get into it this time, but it's just gonna be a case of seeing it through to the end. Andy deserves some good quality characters to go along with his cracking animatic he just finished.

So. I've nothing to show as far as the pirates are concerned, but i've a crap load to show for LIGHTNING MIKE rrrrrowerowjie.

This week i've been playing with the basemesh. Initially I changed the proportions of everything as it wasn't exactly to my taste. Here I am using photoshop to measure up the props' to figure out what was wrong. I used the Loomis figure drawing/anatomy book as a guide for what should go where.


After that I basically fiddled around til I was a little more happy. I'm not completely happy, a theme which will reoccur throughout this post, but what can you do...

So the proportions have changed, probably not very noticeably but whatever. After that, though, I got to do UVs!!


Here's an unnecessarily large snapshot, but couldn't be arsed to resize. My first proper set of uvs, they are. I didn't really mind the process. Sort of like a silly puzzle. That's just one set out of a forthcoming 21309821 though, so i'm sure i'll start to mind after a while.

After that I got to go to mudbawks. In mudbawks I spent forever and a day trying to tweak the model. Basically it's HARD to hi-poly model. The process reminded me of painting in photoshop. Tweak tweak tweak and you get nowhere. I don't think my personality helps me out here as i never seem to be happy. But I feel like I just need more experience with the program and it'll slowly get better. Of course this isn't the best position to be in facing what I am, but i'll sort something out.

I got tired of failing so I took what i'd made (a hi-res with very few changes, although the little that were there i was relatively (key word) happy with). Did a load of boring crap and took it into Maya to find that stuff wasn't working. To cut a looooong story short I basically had potentially 3 problems.

1. My UVs were linked up incorrently. Fixed by going Relationship Editors - UV Linking - Texture Centric and linking them right.
2. I forget two but there was definitely a two. EDIT: oh, it was normals. I had insane normals going on, so Georg helped me out, fixing it by exporting it as an OBJ without normals then importing it back in.
3. Cherie said that in Mudbox you have to have Smooth UVs checked (Mesh > Add Subdiv Level option box). Although i'm not sure if this did anything, i've ticked it now and it's going smootly. Here's an example of my problems anyway, Left is some bonkers stuff that may have been due to problem 3. Middle is problem 1. and right is a test i did to figure stuff out.


After that was sorted, I applied all my maps correctly and that stuff and this was the result.


Left is base mesh, middle is with normal map, right is my mudbox hi-res. As you can see there seems to be fuck all difference! there's very slightly more definition than the base mesh... So... i'm not entirely sure why this is - possibly because of shoddy normal maps or just because the hi-res really isn't that different... although to me it looks pretty different in the mudbox sculpt. Perhaps that's an optical illusion cause of the mud. Regardless, I figured i'd just continue on rather than get stuck in a rut. The next stage was textures, so I laid down a flat colour on my UVs and applied it. But then I thought 'what about lighting?'. So i found a tutorial online to create a basic light rig. Here's some snaps of that. (boring.)


So I played with the materials and crap and ended up with this:


As per usual, I am not happy. The whole thing just looks amateurish and mooshy and crap. I'm in half a mind to restart entirely, but that's probably not a good idea. I'll stop the moping, for now anyway, have a nice weekend (Los Campesinos! tonight! :D) and see what my brain thinks on monday.

Before I leave, here's one last thing that I did this week, and it's cool. Basically we're arranging a street fighter tournament in falmouth and I made the posters :D Won't indulge because andy's waiting for me to leave but here are some of the versions I made and subsequently plastered up around uni ^_^ can't wait for this. By for now !


Thursday 18 February 2010

Rush!

Finding it pretty hard to keep up with the posting. Recently I haven't even been able to go to life drawing because of all the things getting in my way (e.g. Dissertation, Channel 4 project (i know, extracurricular but whatever, real life, etc.). That's actually a bit of a shame cause i'd like to be doing more life drawing atm, but you gotta do what you gotta do.

I rushed this post together for the benefit of the production meeting yesterday, but now I have time to actually write something, so I shall, although I have little to show due to the intense tedium of the work that i've been doing over the last two weeks.

Basically I spent the back end of one of the weeks redrafting my dissertation, and doing the inane bits and pieces like formatting, bibliography... fucking yawn. I cba talking about it but it's done, and I was reasonably happy with it. Gave it to my smart housemate to proof read one night and he said he enjoyed it, too, which I took as a good sign.

When that got finished I undertook the even more exciting task of painting weights! For those of you who don't know, creating characters goes like this. Design -> Model -> Rig -> Bind/Paint Weights. (UVs, Texturing and Blendshapes are also slotted in along the way.) The binding/weighting refers to the process of instructing certain parts of the model to be controlled by certain bones or joints of the rig. Probably superfluous mentioning this but whatever. It seems almost invisible - noone ever really pays any mind to the effort that has to be put in to such trivial parts of character creation to make it really successful. But basically this is what i've been up to for the past week.

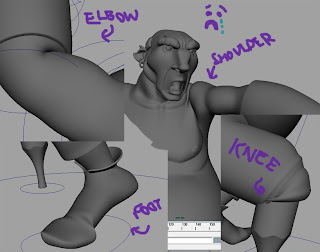
Once you've roughed out the weights, your character roughly moves how he should, but every part of the model that bends in any way must be finely tweaked until it looks right. You'll get areas like these:


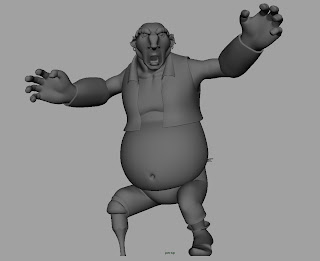
Notice the horrible areas of deformation like the shoulder etc, where the 'skin' doesn't move naturally. It overlaps as if it were cloth or something.. anything that's not skin. Anyway, these examples aren't even that extreme. Going back to Buckle it seems that for the most part he's actually weighted reasonably well, considering I didn't use any plugins like PoseDeformer (which i'll touch on later). So here's the stage he's at at the minute.


Not bad... not bad... I think the to do list atm is as follows:

Fix mouth (easy)
Fix peg-leg knee (hopefully easy with poseDeformer)
Potentially fix upper legs... (although i'm not sure aka I hope this isn't necessary)

Then Andy's left to do Swash and one day they'll be finished! I say one day because there's still a shit load left for him to do, the poor lad :( I sort of wish I could help out more but if I want to make anything that is really my own and do it well then I need to move on :/

Anyway, poseDeformer.

Michael Comet is a brilliant man who's spent who knows how long making reaallly handy scripts for Maya, and they're all for free! I came across the scripts through the Gnomon rigging videos that i've watched, and i've been using the CometTools for a while now, which includes handy things like easy shape creation and tools for playing with orients etc, but only in this past week have I started using poseDeformer which is just brilliant. What you do is move the character into a pose that deforms badly, run the script, follow the instructions, and you're allowed to move vertices, edges, basically model as you traditionally would until the pose looks nice and bob's your uncle! There's no point me going into any more depth but suffice to say it's insanely handy and i'll be using it on all future rigging projects :D

Link to his website here -----> http://www.comet-cartoons.com/

Do yourself a favour and check it out. You can also find poseDeformer compiles for all Maya versions with a quick google.

One last thing that i'll mention is that i've created a reverse rig on the main character :) Thanks to Georg for figuring it out, it's easier than it seems and just took me a little while creating a bunch of set driven keys to mess with constraints and bob is yet again your uncle. No example here but it'll allow the guy to swing from ropes and crap like Andy wished.

HHHHHHHOPPPEFULLY i'll have some pretty pictures up for next time! Some beautifully mudboxed boxer faces :D Actually sounds quite exciting. Anyway that'll do, ciao B)

Thursday 4 February 2010

Proost

Blog time! Bit of a weird time to be doing it but I missed last friday :x Surprisingly I feel really far behind on the blogging already :O I've got quite a bit to show, and there won't be much writing cause it's presentation time today. In brief, since my last blog i've kinda completed my basemesh for the Boxer ready for mudbox, I fixed some problems with Andy's rig, and accepted EVEN MORE work in the form of drawing a sketchbook for Pete's channel 4 show :D

So here are the pics. In chronological order.


Here's a little picture I made that looks at the topology of my model. On the right you see the original model that I made, and as you can see it's pretty dense. From the start I didn't want to limit myself to make a low-poly model, but I thought this was far too dense, particularly in the chest, so I decided to start it from scratch again from the collar bone area. You can see the reworked model in the center with a much tidier and less dense mesh. I think it's a great improvement, especially as it gives a similar shape to what I want with much less geometry than the original.

You can also see where I played around with the original in Mudbox (although this demonstrates nothing, really) and where I started playing around with a really great plugin called nex, which you can use to draw polygons directly onto other models. I think this would be really handy in retopologising hi-poly models, and i'll almost definitely use it again in the future, although I didn't think it was necessary in this case, really.

Just for a second I'll go back to show the reference that i've been working from for this guy.


Some of this you've seen before, but that doesn't matter. Basically the problem that I encountered was the way that the guy varies so much. Of course this is my fault but due to this I found it quite difficult on deciding on a final look for the guy, when it came to drawing a turnaround of him. I settled on this, with the thought that I can change whatever I want as I go along.


I wasn't 100% happy with how these turned out, but they were decent, mostly proportion-wise. And again, I can change whatever I want as i'm my own boss! >:O

So back to the modeling. As I said I've finished the basemesh... sorta. So here it is!


I'm kinda happy with this guy, but since the beginning there's something that's just been... off. I think it's gotta be the face, which will be the thing that takes the most tweaking. Also as i've said to some tutors I think when I get round to doing the blendshapes, the extreme expressions should really bring him to life as in every drawing I've done he's been grinning or scowling or something like that, whereas here he looks dead boring.

I also think the proportions could use more work - although i'm not sure in which area, or perhaps if it's just the pose.

Although I am happy with certain parts of the model. I'm quite chuffed with the topology of the body, I think it's a decent density mesh with all of the definitions that I wanted. I'll add bits and pieces in mudbox but I think it's a really solid basemesh. Fingers crossed it'll deform well, too.

I'm also pretty happy with the accessories that i've modeled, eg. the gloves and the shoes. Check out these babies :P


took me like a day to model lolz. But yeah, this is where i'm at. Next week is back to Andy's models for weighting (urk) and the week after it's back to my guy! I'm a bit behind, I won't lie, and that's a nightmare. But i'm sure it'll all sort itself out in the end.

As a bonus here are some of the drawings that i've done for Pete!


Thankyou and goodnight!